My Jekyll Blog Writing Workflow
The workflow of this blog.
The disadvantage of using a static blog is that the initial deployment work is relatively complex, but the advantage is that maintenance and migration will be relatively simple after the initial preparation. In this article, I will briefly explain how I manage my articles and maintain the blog deployment workflow.
Post Version Control
I mentioned earlier that I use Vercel as the hosting platform for this blog. Every time I push to the specified branch in the blog’s GitHub repository, Vercel will regenerate the static website and deploy it on its servers.
All of Jekyll’s articles are located in the _posts directory. When committing, pay attention to which new .md files need to be uploaded. You can choose to upload only the articles you want to make public.
Additionally, if you want to temporarily hide or simply don’t want to manage which files need to be uploaded, you can use Jekyll’s built-in hiding feature. Add published: false in the YAML metadata of an article to hide it. To show the article again, comment out this line by adding a # at the beginning of that line.
Markdown Writing
Markdown is a syntax format for marking language, using symbols to define basic styles such as headings, quoting images and hyperlinks, and bold and italic text. This allows writers to write smoothly without worrying too much about formatting.
I recommend using Typora as a tool for writing Markdown locally. The advantage of Typora is its “WYSIWYG” feature, rendering content while writing in Markdown. It combines the portability of Markdown with the advantages of classic visual text editors.
Typora is a one-time payment app, priced at $15 and can be authorized on 3 devices simultaneously. I have been using this software for many years before it introduced the paid version, and I have always been satisfied with it. If you plan to use Markdown for writing long-term, I suggest purchasing it.
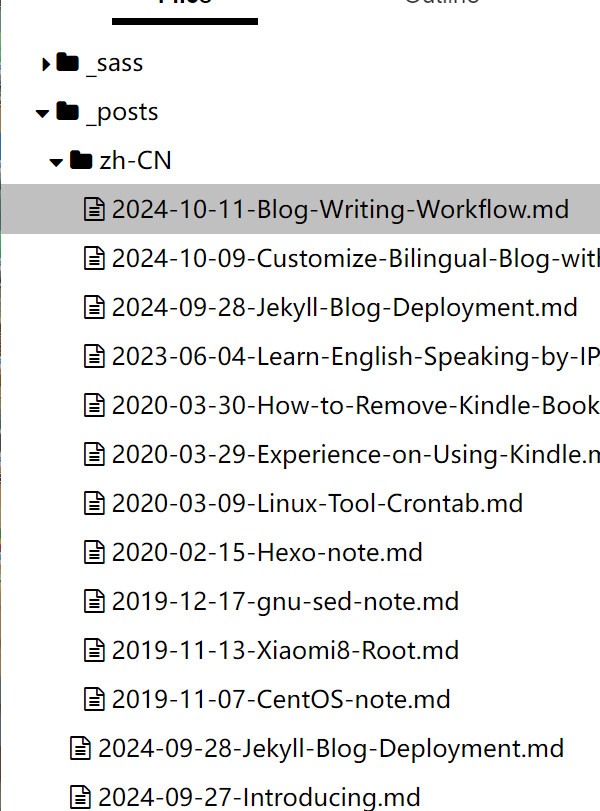
All articles in Jekyll are located in the _posts directory. In Typora, you can easily manage your writing interface by opening the _posts directory of your Jekyll project through “Open Folder.”
Jekyll requires all article Markdown files to be named in the format of YYYY-MM-DD-TITLE, and considering that the Chirpy theme does not support custom permanent links for articles, it will use TITLE to generate permanent links for articles. It is recommended to arrange them in reverse order based on the article title. This way, the newest articles will be displayed at the top of the list.
Image Insertion
There are only two ways to insert images into Jekyll. Either create a new image folder in the root directory (you can name it image or picture, etc.), put all the images in that folder, and then use relative paths when referencing images in Markdown; or upload images to other image hosting platforms.
The advantage of the former is that you manage all the images yourself, making data relatively safe and easy to migrate for local browsing in the future; however, it can also make your project repository bulky and require additional operations when migrating to other platforms.
The advantage of the latter is that as long as the image hosting platform does not close down, the hyperlinks of the images will remain on the internet for a long time; but rearranging them locally will take some effort.
I choose to use a public GitHub repository as an online image hosting service for my blog. After all, the probability of GitHub closing down is not that high. However, using GitHub also has its downside - others can browse through your public GitHub repositories and access all your images, even if you haven’t uploaded corresponding articles to your blog but simply used this GitHub repository as an image host.
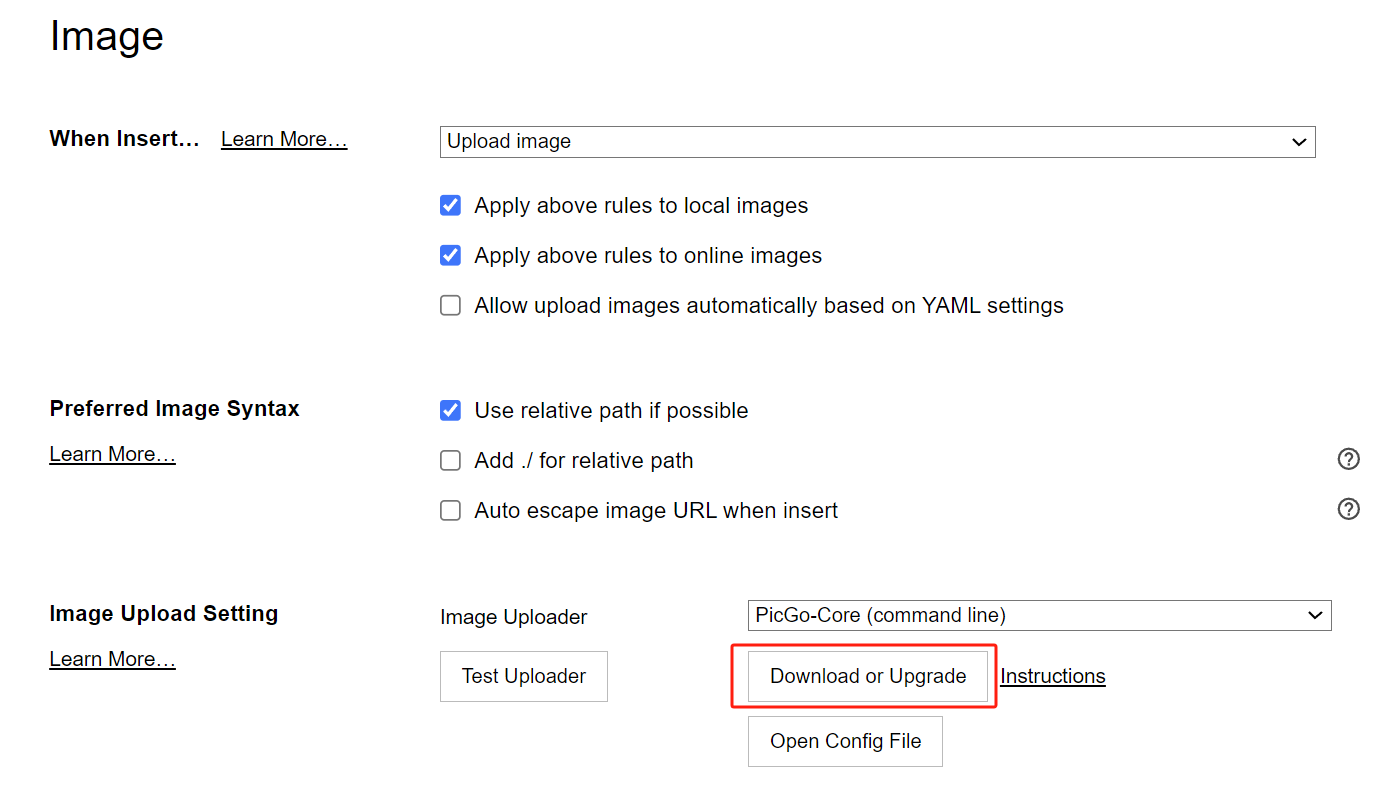
Typora provides the function of automatically uploading imported images to the image bed using PicGo. You can download and install it in Typora’s settings.
Configure the config.json:
1
2
3
4
5
6
7
8
9
10
11
12
13
14
{
  "picBed": {
    "current": "github",
    "github": {
      "repo": "yourusername/yourreponame",
      "token": "github_token",
      "path": "img/",
      "customUrl": "https://raw.githubusercontent.com/yourusername/yourreponame/main",
      "branch": "main"
    }
  },
  "picgoPlugins": {}
}
The path can be customized, meaning the path under the GitHub repository. The img/ means using the img directory in the root directory of the repository as the directory for storing images.
According to PicGo official website tutorial, besides needing to create a new GitHub repository, you also need to provide a GitHub token that can operate this repository.
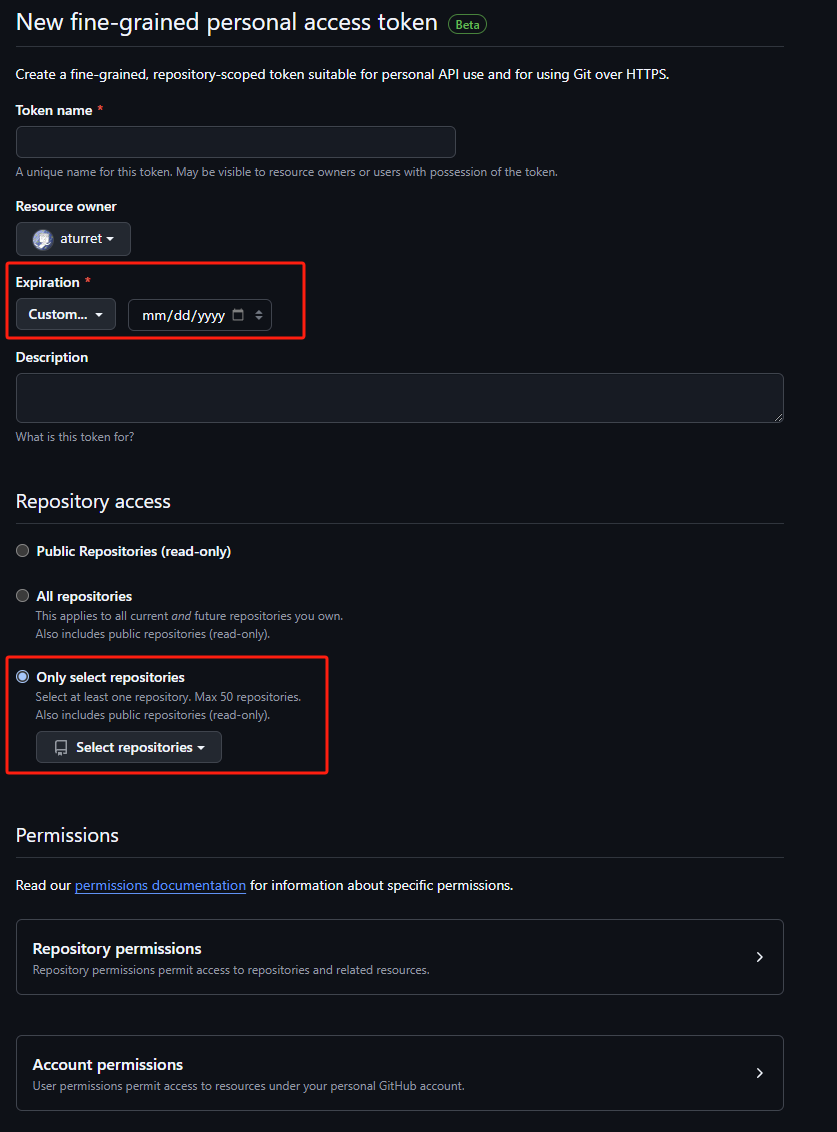
First, go to https://github.com/settings/tokens, click “Generate new token” to generate a new token.
Then fill in the required options. Note here that the expiration date can be filled as late as possible so that maintenance is not required frequently. In addition, warehouse permissions are limited to a specific warehouse only. All other permissions behind can be opened as you want.
Comments
By the way, this GitHub repository can also be used as a blog comment section. Chirpy provides the functionality of using giscus as a blog comment system, which can be modified in the configuration file.
1
2
3
4
5
6
7
8
9
10
11
12
13
14
15
16
17
18
19
20
21
comments:
  # Global switch for the post-comment system. Keeping it empty means disabled.
  provider: giscus # [disqus | utterances | giscus]
  # The provider options are as follows:
  disqus:
    shortname: # fill with the Disqus shortname. › https://help.disqus.com/en/articles/1717111-what-s-a-shortname
  # utterances settings › https://utteranc.es/
  utterances:
    repo: # <gh-username>/<repo>
    issue_term: # < url | pathname | title | ...>
  # Giscus options › https://giscus.app
  giscus:
    repo: username/reponame # <gh-username>/<repo>
    repo_id: <repo_id>
    category: Announcements
    category_id: <category_id>
    mapping: # optional, default to 'pathname'
    strict: # optional, default to '0'
    input_position: # optional, default to 'bottom'
    lang: en # optional, default to the value of `site.lang`
    reactions_enabled: # optional, default to the value of `1`
The repo_id and category_id here can be obtained in the configuration guide on the giscus official website. After filling in your own username/reponame, the example configuration file below will display the corresponding id.
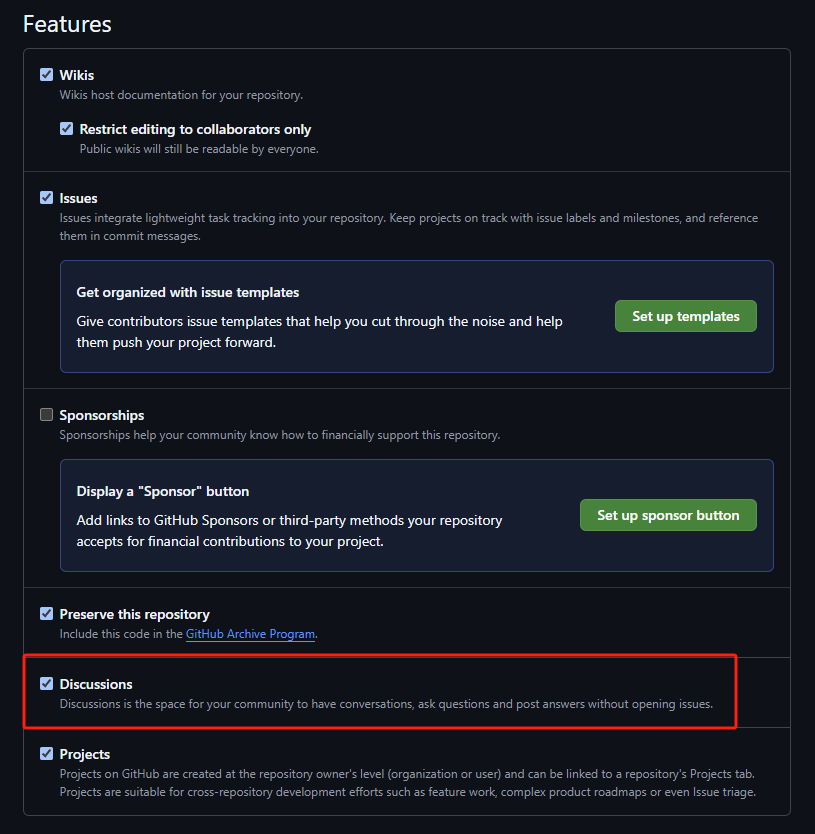
Also, don’t forget to enable discussion feature for this repository.
The advantage of doing this is that the comments will always be available as long as GitHub does not shut down, and it also makes it easy to customize and migrate. The downside is that without a GitHub account, you cannot leave comments.
However, it still seems reasonable. If there was no GitHub, maybe people wouldn’t even think about reading this blog. For those who can read this blog, registering a GitHub account is not difficult.


